Putting the componenet on a npc does not seem to be working therefore you need to put an prefab (i recommand putting for exemple a prefab in link with the farm)
##### - ****EL\_restrictedInventoryStorageCompinent****: this component seem to be the one who are filtering the item you can exchange [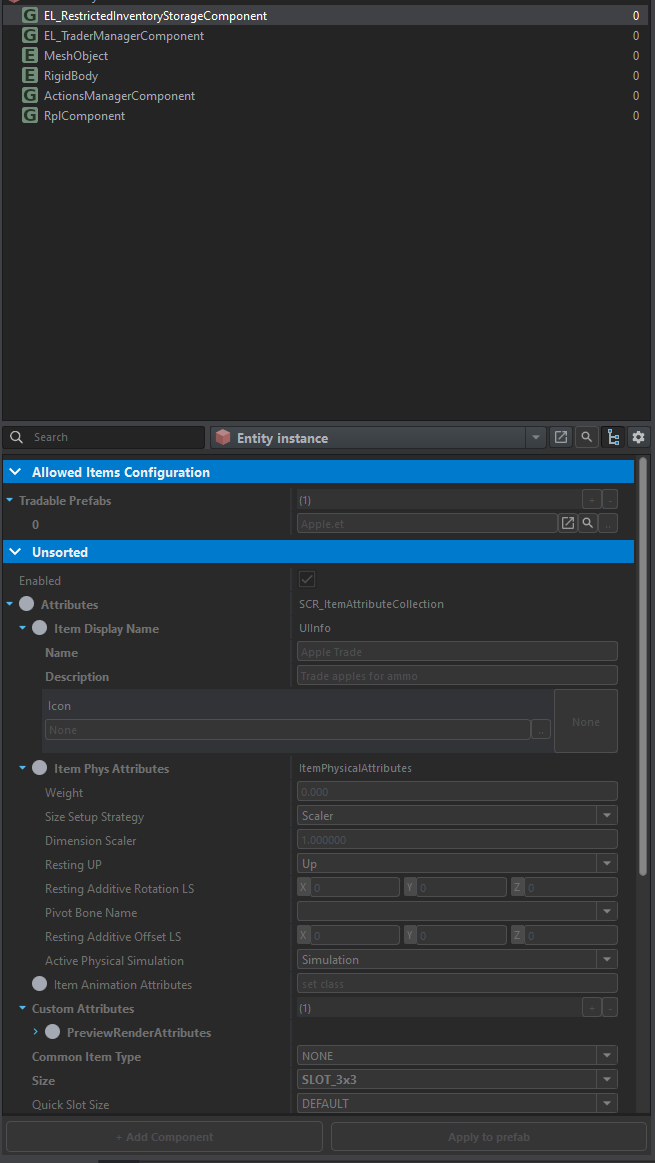](https://wiki.nabla.sh/uploads/images/gallery/2024-12/CyGimage.png) we see here at the begining the item that the prefab take (in the exemple it's an apple) ##### ****- EL\_TraderManagerComponent**** [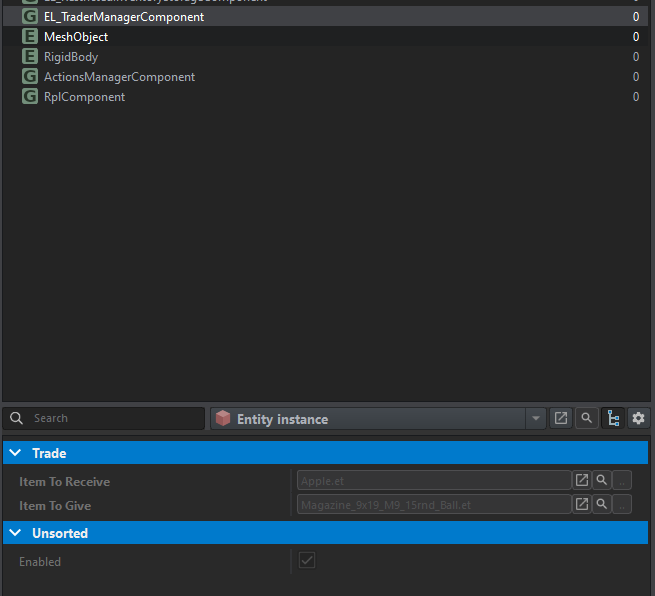](https://wiki.nabla.sh/uploads/images/gallery/2024-12/DITimage.png) This component is therefore used to take an item and exchange it for another. ##### ****- Action manager**** [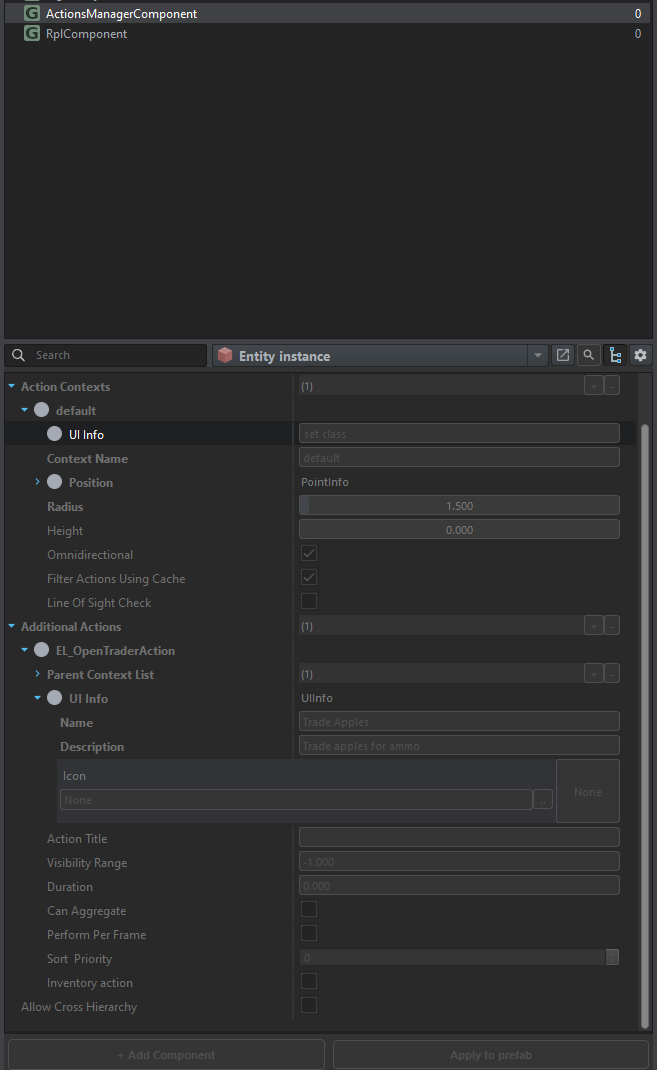](https://wiki.nabla.sh/uploads/images/gallery/2024-12/JOWimage.png) # Create a transform building we are using the same everon and looking after the ciment process: [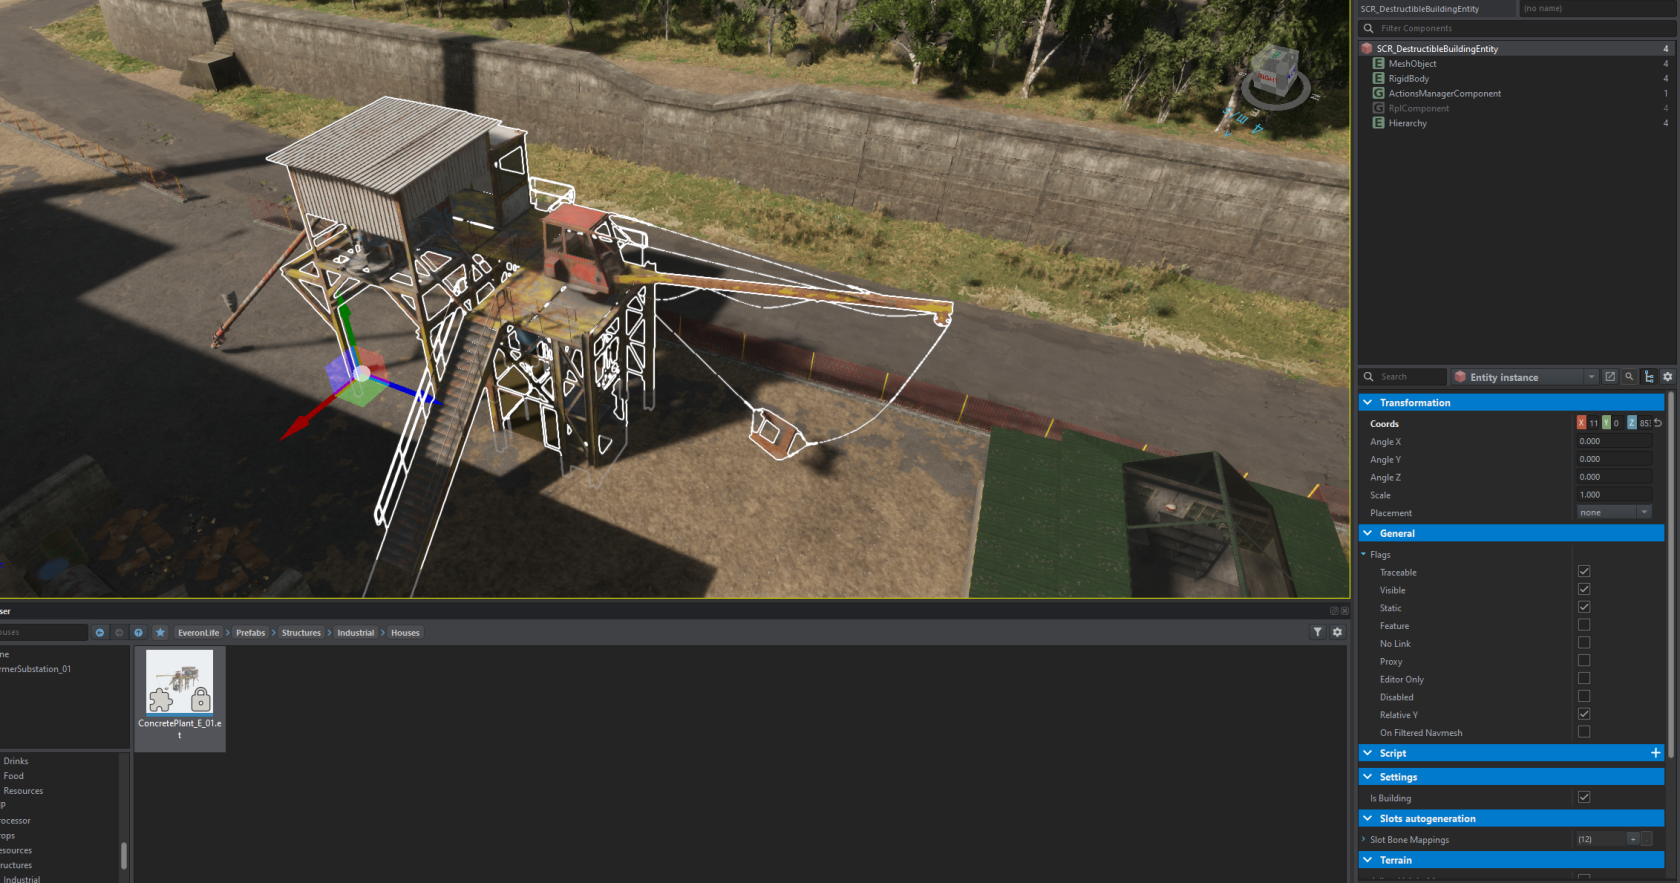](https://wiki.nabla.sh/uploads/images/gallery/2024-12/7Dvimage.png) when looking to the action manager we have information on how its working: [](https://wiki.nabla.sh/uploads/images/gallery/2024-12/hQ2image.png) as we can see we have 3 input prefab and 1 output: [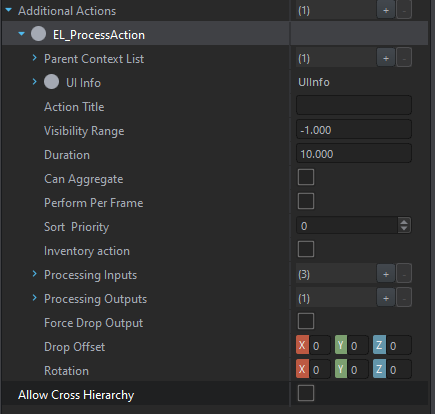](https://wiki.nabla.sh/uploads/images/gallery/2024-12/Ferimage.png) we need to collect all 3 to get the output, as we can see we can tell how many of each ingrediant we need: [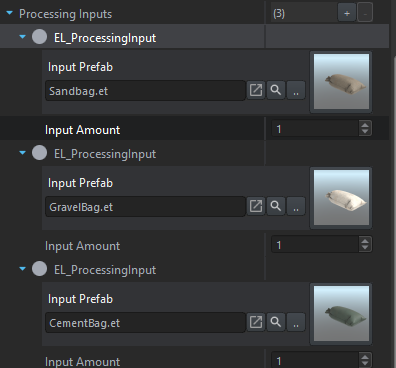](https://wiki.nabla.sh/uploads/images/gallery/2024-12/Erbimage.png) After that we put whta prefab as an output we have and select how many we have: [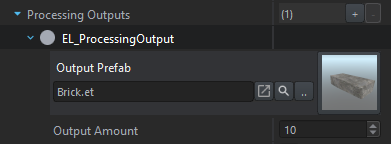](https://wiki.nabla.sh/uploads/images/gallery/2024-12/QbPimage.png) # CRX mission header settingbased on the message: [https://discord.com/channels/105462288051380224/1050433454388547644/1356396266107437237](https://discord.com/channels/105462288051380224/1050433454388547644/1356396266107437237)
Requirement: ****CRX Enfusion A.I. ( STABLE 1.3 Update v.1.3.14 )****
****1. you will need to add thsi to your config of your dedicated server:**** **"missionHeader": {** **"m\_CRX\_Settings": {** **"m\_bIsCRX": true,** **"m\_fWeaponFiredReactionDistance": 500,** **"m\_fSuppressedWeaponFiredAudibleDistance": 100,** **"m\_bInvestigate": true,** **"m\_eCombatMode": "YELLOW",** **"m\_bSuppress": true,** **"m\_fPerceptionSafe": 1.0,** **"m\_fPerceptionVigilant": 3.0,** **"m\_fAimAccuracyErrorModifier": 0.0** **}** **}** ****2. it will have somethin like that:**** [](https://wiki.nabla.sh/uploads/images/gallery/2025-04/hcfimage.png) ****3. Tweak the setting as you wish****| Parameter Name | Default Value | Simple Description | In-Game Effect |
|---|---|---|---|
| `m_bIsCRX` | `true` | Enables CRX-specific settings | Signals that CRX AI settings are active for this mission. Can be used by other scripts to toggle CRX-related features. |
| `m_fWeaponFiredReactionDistance` | `500` | Distance (in meters) within which AI groups react to unsuppressed gunfire | Higher values make AI detect and react to gunfire from farther away. They may become alert, take cover, or move toward the sound source. |
| `m_fSuppressedWeaponFiredAudibleDistance` | `100` | Distance (in meters) within which AI can hear ****suppressed**** gunfire | Controls how well AI detect suppressed gunfire. Useful for stealth missions — lower values mean better stealth, higher values mean AI are more aware of silent shots. |
| `m_bInvestigate` | `true` | Enables AI investigation behavior | If enabled, AI will investigate suspicious events like gunshots, dead bodies, or enemy presence. Makes AI behave more intelligently and realistically. |
| `m_eCombatMode` | `"YELLOW"` | Initial combat readiness mode for AI | Controls how alert AI are: `YELLOW` means alert but not engaged, `RED` means fully engaged in combat, etc. Affects how quickly they react to enemies and how they patrol or hold positions. |
| `m_bSuppress` | `true` | Enables AI suppression fire behavior | If enabled, AI will use suppressive fire tactics — shooting to pin enemies down rather than aiming directly, especially in combat or ambush situations. |
| `m_fPerceptionSafe` | `1.0` | AI perception level in **safe** (idle/patrolling) state | Higher values mean AI will more easily notice small sounds or movements while in relaxed or non-alert states. |
| `m_fPerceptionVigilant` | `3.0` | AI perception level in **vigilant** (alert but not engaged) state | Similar to above but applies during heightened alert status. The higher the value, the more easily AI spot threats even before direct engagement. |
| `m_fAimAccuracyErrorModifier` | `0.0` | Modifies AI aim accuracy error. Positive = worse aim, Negative = better aim | Adjusts AI shooting skill: `+1.0` makes them miss more often, `-0.5` makes them more accurate than default. Useful to tweak AI difficulty based on your mission or gameplay balance. |
| ****Attribute**** | ****Description**** |
|---|---|
| `m_eGroupType` | Defines the type of group to spawn (e.g., Fireteam, Squad). |
| `m_bPickRandomGroupType` | Randomly selects a group type on spawn. |
| `m_isGroupUpdate` | Enables dynamic group change after X respawns. |
| `m_iGroupUpdateRate` | Number of respawns before group type is updated. |
| `m_iRespawnPeriod` | Time (in seconds) before the group respawns. `0 = no respawn`. |
| `m_fAILimitThreshold` | Prevents spawning if too many AIs already exist globally (as ratio). |
| `m_iNum` | Number of groups to spawn at once. |
| `m_eTargetType` | Defines the AI’s target type: `MainTarget`, `EnemyMainTarget`, `Base`, `CapturePoint`, or `Player`. |
| `m_fTargetRange` | Maximum distance to target to allow spawn. |
| `m_sTargetFactionKey` | Key of the enemy faction (e.g., "USSR") for target logic. |
| `m_iTargetUpdateTimeout` | Time interval (ms) between target updates. |
| `m_iWaypointUpdateTimeout` | Time interval (ms) between waypoint recalculations. |
| `m_fDespawnRange` | If no players are within this range, AI will despawn. |
| `m_fSpawnProtectRange` | Prevents AI from spawning too close to players. |
| `SpawnProtect` | Enable/disable spawn protection behavior. |
| `dynamicDespawn` | Despawn AI when players are far away. |
| `spawnOnlyNearest` | Only spawn if this base is closest to the current target. |
| `m_iPlayer` | Number of players required to allow spawn. |
| `m_sNoSpawnFactionKey` | Disables spawn if nearest base belongs to this faction. |
| `m_sSpawnOnlyFactionKey` | Enables spawn only if nearest base belongs to this faction. |
| `m_bShowMarker` | Show map marker for the AI group. |
| `m_bShowToEveryone` | Make the marker visible to all factions. |
| ****Attribute**** | ****Description**** |
|---|---|
| `m_sVehicle_TeamSentry` | Prefab for vehicle used by ****TEAM\_SENTRY**** group. |
| `m_sVehicle_TeamMG` | Prefab for vehicle used by ****TEAM\_MG**** group. |
| `m_sVehicle_TeamAT` | Prefab for vehicle used by ****TEAM\_AT**** group. |
| `m_sVehicle_Fireteam` | Prefab for vehicle used by ****FIRETEAM**** group. |
| `m_sVehicle_SquadRifle` | Prefab for vehicle used by ****SQUAD\_RIFLE**** group. |
| `m_sGetInWaypointPrefab` | Waypoint prefab used by AI to mount the vehicle after spawn. |
| ****Attribute**** | ****Description**** |
|---|---|
| `m_sMortar` | Mortar prefab to be spawned (e.g. `MortarPlacement_S_USSR_01`). |
| `m_sGetInWaypointPrefab` | Waypoint for AI to enter the mortar (typically `AIWaypoint_GetInNearest`). |
| `m_sArtillerySupportWaypointPrefab` | Waypoint to handle firing behavior (typically `AIWaypoint_ArtillerySupport`). |
| `m_iShots` | Number of mortar rounds per firing session (`-1` = infinite, recommended: 5–10). |
| `m_iMortarTimeout` | Time between two fire waves (milliseconds). |
| `m_fmaxRange` | Max distance for randomizing target position (meters). |