# Paint with mask
No, this isn’t about painting in a costume! It’s about applying textures to the terrain without using the Paint tool in the World Editor, by using texture masks instead.
**By Tanin69**
# Why this tutorial
There are several cases where this process is beneficial, either to save time or because there’s simply no other way. Here are a few typical scenarios:
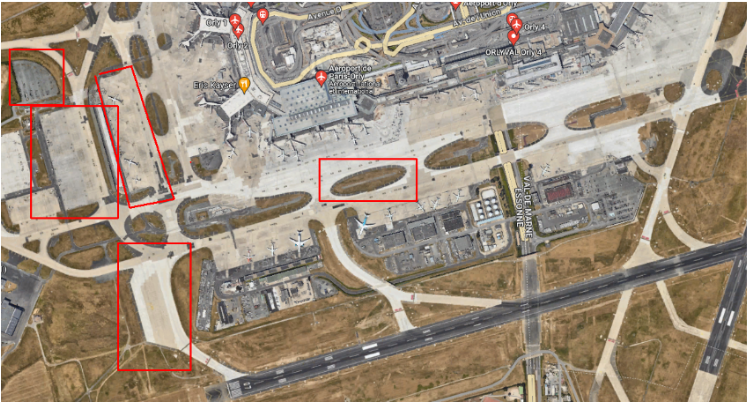
1. ****Creating Geometrically Perfect Textures****:
Some areas, like airports, require nearly perfect geometric surface textures. Airport ground textures, for instance, are usually composed of geometric shapes.
[](https://wiki.nabla.sh/uploads/images/gallery/2024-11/N20image.png)
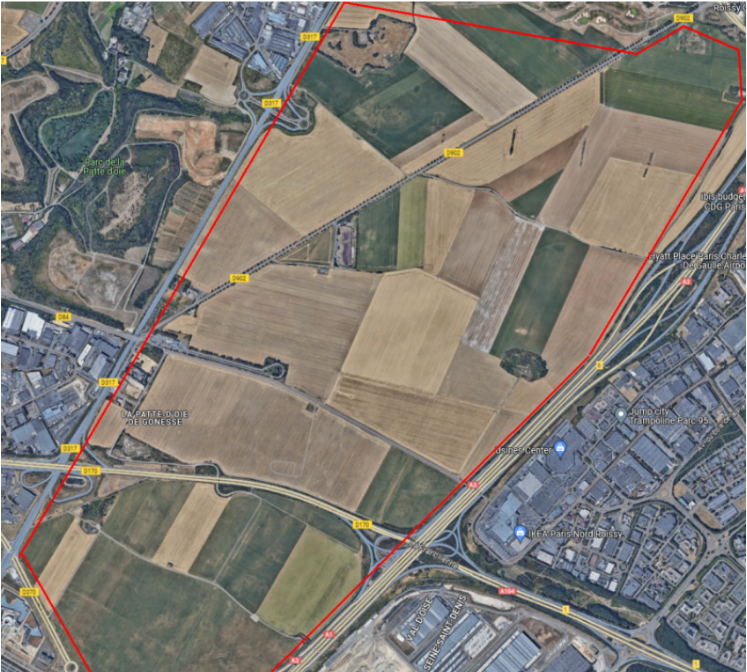
2. ****Mass Texture Generation****:
If you need to create large areas without manually painting each one individually, like agricultural field checkers, this process is invaluable. Doing this by hand over half your terrain would be a massive task!
[](https://wiki.nabla.sh/uploads/images/gallery/2024-11/HnJimage.png)
3. ****Specific Road Textures****:
For textures under road generators, especially for “runway” types, the standard road generation method (exporting surface masks, generating the satmap, importing with “generate roads” enabled) doesn’t support this particular texture type. Unfortunately, there’s currently no straightforward way to draw perfectly geometric shapes with the Paint tool. If I’m wrong, please correct me!
In these cases, the “least bad” solution is to work with surface masks.
# Warning
Please note, this is the “least bad” solution I’ve found so far, as it has a significant drawback: it requires re-importing one or more surface masks, which usually modifies tiles you didn’t intend to change. This has two side effects:
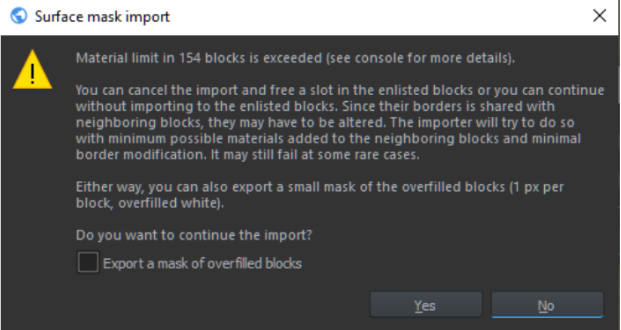
1. ****Material Limit Errors****: When importing a surface mask, you may encounter errors related to the material limit per tile. In our current project, this affects dozens of tiles, sometimes even over a hundred.
[](https://wiki.nabla.sh/uploads/images/gallery/2024-11/b3Dimage.png)
- ****Only click “Yes” if you’re fully aware of what you’re doing!****
2. ****Satmap Regeneration****: To clearly see the result of your work, you’ll need to generate a new satmap and re-import it. This, too, will modify all tiles. If you’re working alone, that’s fine. But if you’re working with others, you’ll be modifying your colleagues’ tiles (specifically their textures), which is highly discouraged and could potentially ruin their work.
We’ll cover how to work around these issues later, but this involves multiple steps with significant calculation times. If you’re working with an older graphics card or have a slow connection, be prepared for lengthy processing times (generating a new satmap, for instance, can take several minutes to even an hour).
# Overview of the Process
- ****Define Texture Zones with Polylines****:
Use polylines to outline the areas where you want to apply textures.
- ****Export to SVG****:
Export these areas as an SVG file.
- ****Import SVG into an Image Editor (e.g., GIMP)****:
Open the SVG in an image editor and apply two simple transformations, in a specific order.
- ****Modify the Surface Mask****:
Import the surface mask into the image editor, make the necessary adjustments, and export the updated mask.
- ****If working solo, make a backup of your project before proceeding!****
- ****If working with a team on a remote repository, follow the guide carefully**** to ensure smooth collaboration.
- ****Import the Mask into Enfusion****:
After all modifications, import the updated mask into Enfusion.
- ****Generate and Re-import the Satmap****:
Generate a new satmap to reflect your changes, then re-import it.
- ****Update Sources with a Semi-Manual Process****:
Apply only the modified tiles, preserving your teammates' textures by avoiding overwrites.
# Creating Masks with Polylines
To create masks, define all the areas with polylines for which you want to generate texture masks. Then, export these polylines in SVG format. It’s helpful to create a dedicated layer for this purpose, as you’ll need to select only the specific polylines to export.
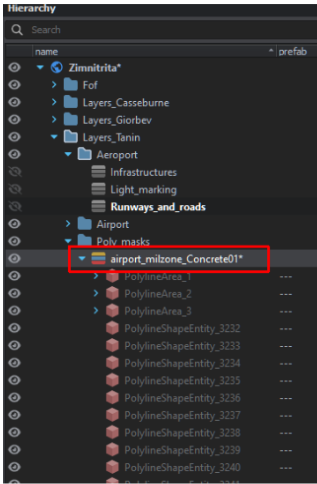
****Example****: I need to cover certain areas with the Concrete01 texture.
- First, I create a new layer and place all the export-ready polylines there.
[](https://wiki.nabla.sh/uploads/images/gallery/2024-11/R6simage.png)
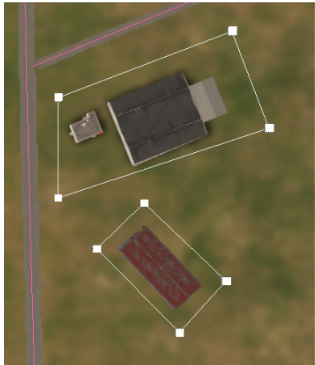
- Then, I draw the polylines, adjusting their colors as needed to differentiate them.
[](https://wiki.nabla.sh/uploads/images/gallery/2024-11/GrXimage.png)
#### Tips
- ****Creating Polylines from Existing Splines or Polylines****:
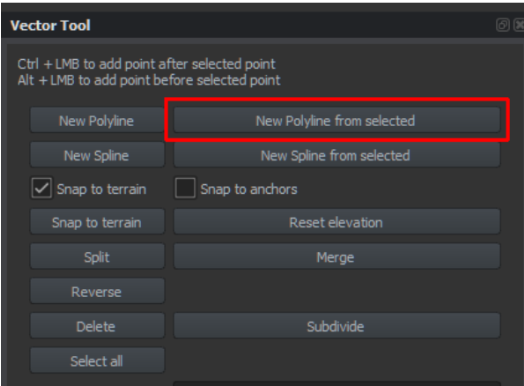
- Switch to the **Vector Tool**, select points from an existing polyline or spline.
- If you want to select all points, use the **Select All** button.
- Click **New Polyline from Selected** to create a new polyline from the selection.
[](https://wiki.nabla.sh/uploads/images/gallery/2024-11/4Gjimage.png)
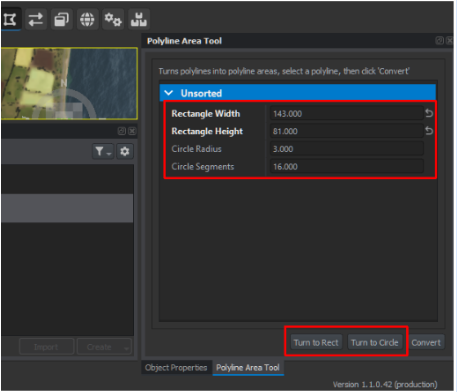
- ****Creating Rectangles, Squares, or Circles****:
- Start by creating a polyline with at least two points.
- Convert this polyline into a **Polyline Area**.
[](https://wiki.nabla.sh/uploads/images/gallery/2024-11/HFHimage.png)
- ****Experimenting with Parameters and Buttons****:
Adjust parameters and explore available options to get the desired results.
[](https://wiki.nabla.sh/uploads/images/gallery/2024-11/f2Yimage.png)
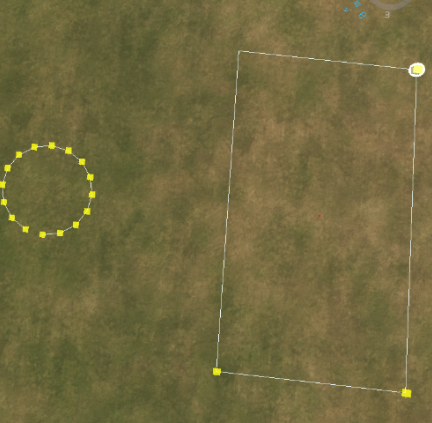
****Examples of Results****: This technique isn’t limited to creating masks; it can also be used for roundabouts, soccer fields, etc.
[](https://wiki.nabla.sh/uploads/images/gallery/2024-11/Qrximage.png)
### Limitation
Currently, I haven’t found a straightforward solution for creating masks for curved runway generators. After all, who needs curved runways, right? 😂 The default road generator lacks a Concrete (non-transparent) material, so until someone develops it, the only workaround is approximating curved roads with carefully placed polylines.
# Exporting Polylines in SVG Format
1. In the hierarchy, select the polylines you wish to export.
2. Click on the **Export Geographic Data** tool.

3. Choose the appropriate options and click **Export**.

> ****Note****: With this setup, the generated file will be named `export.svg` and saved in the **profile** folder within your default **Workbench** directory.
> 
# Importing the SVG into GIMP
****Important****: SVG exports are not exactly the same size as the surface masks. To avoid misalignment between the SVG masks and Enfusion’s surface mask, follow these steps in the exact order:
1. ****Import the SVG into GIMP****.
2. Apply a ****vertical mirror transformation**** to the image.
3. ****Resize the image**** to match the exact dimensions of Enfusion’s surface masks.
After completing these steps, you can continue working in GIMP without alignment issues.
# Importing Existing Enfusion Textures into GIMP
For those familiar with surface masks, this process will be straightforward. If not, I recommend watching this video: [Surface Mask Tutorial](https://youtu.be/pJ1QKCz-f3M?si=-IA5FTm06qWLhr5u).
1. ****Export the Surface Mask**** corresponding to the texture you want to modify.
2. ****Import this mask into GIMP****. I recommend adding it as a new layer in the SVG image you previously imported, but there are other methods as well.
3. ****Modify the Mask****:
- The main task is to paint white over the areas of the surface mask layer that correspond to the SVG mask layer.
- My approach:
- On the SVG layer in GIMP, select all painted areas.
- Switch to the surface mask layer.
- Paint the selected areas white.
4. ****Export the Image as PNG****: It’s highly recommended not to overwrite the original Enfusion mask, so you can revert changes if needed. Use a clear naming convention for your modified mask, e.g., `Concrete01-mod1.png`.
# Importing the Modified Surface Mask into Enfusion
****Warning****: Importing the texture mask will modify all tiles and will likely trigger errors (see the previous warning). If you’re working alone, be sure to make a backup of your terrain before importing the mask.
If you’re working in a shared environment with a remote repository, you’ll need to retrieve the latest repository state and perform a “semi-manual” update (explained in upcoming steps).
1. ****In Enfusion, import the modified mask file**** (e.g., `Concrete01-mod1.png`) into the appropriate texture slot.

2. ****Repeat as Needed****: You can repeat these steps as many times as needed to refine your texture adjustments, smoothing, shapes, etc. However, before re-importing a modified texture, it’s recommended to first import the base texture of your terrain to reset previous changes (e.g., in our project, we use the `Grass03` texture as the base).
This will help keep previous modifications clean and maintain consistency across your terrain.
# Updating the Satmap
It’s hard to accurately assess the results of these modifications without generating a new satmap. Since we’re working with large areas, a high-altitude camera view is often required, where only the satmap textures are visible. Therefore, updating the satmap is frequently necessary to see the final quality of your work.
****Warning****: Updating the satmap, followed by refreshing all terrain textures, can be very time-consuming. In our 256 km² project, on a modest setup (like an Nvidia 1060 GPU), these steps take a minimum of 45 minutes
#### Steps to Update the Satmap
1. ****Export All Surface Textures****: Export the updated surface textures.

2. ****Generate a New Satmap****:
Our team uses the [ReforgerSatGenerator ](https://github.com/granQ/ReforgerSatGenerator)Python script by Daniel Granquist, which has saved us substantial time (a big thanks to him!).
3. ****Import the New Satmap****: Import the newly generated satmap into Enfusion.
4. ****Save and Wait for Tile Updates****: Save your project and wait for all tiles to update, which can take 20–30 minutes on similar configurations.
This update is essential for evaluating how your modifications look across large areas of terrain.
# Updating Sources
If you’re working solo, you should have backed up the terrain before the first surface mask import. Simply follow Step 3 to update without overwriting any changes.
If you’re working with a remote repository, follow these steps:
##### Create a Backup:
Rename your project folder, adding a suffix like -MOD to create a backup (e.g., project\_name-MOD).
Retrieve Sources from the Remote Repository:
Initialize the remote repository as if it’s a fresh local setup. For example, using the command line, run:
git init <remote\_repository\_url>
##### Copy Modified Files to the Local Repository:
- From your backup (e.g., project\_name-MOD), copy the following into the local repository folder you just retrieved:
- The layer you’re working on.
- All modified tile files.
Tile File Locations:
##### Locate modified tiles in both:
- project\_name-MOD\\...\\Terrain\\.Data
- project\_name-MOD\\...\\Terrain\\.Editor data
- Copy any files with the tile numbers you modified. For example, if you changed tiles 156 and 157, copy all files containing 156 and 157 from both .Data and .Editor Data directories.
Since this is time-consuming manually (each tile has eight associated files across two folders), I recommend using a Python script to automate the process.
1. Update and Push Changes:
Once the files are copied, update your local repository and push the changes to the remote repository.
This ensures only the intended tile modifications are uploaded without affecting the work of others in your team.