# Simulation Parameters (Brouillon, ne pas supprimer)

Learning to configure the simulation, which includes engine parameters, wheel simulation, suspension, and various other settings.

<span style="white-space: pre-wrap;">Some sections in this category are not covered due to limited knowledge and are marked </span>****(Not covered in this tutorial)****. For any parameter with this note, leave it at default for now unless otherwise indicated. If someone with expertise wants to share their knowledge, please submit a ticket on Discord.

<span style="white-space: pre-wrap;">The component managing the simulation is </span>**VehicleWheeledSimulation\_SA**, which is divided into several areas:  
[![image.png](https://wiki.nabla.sh/uploads/images/gallery/2024-11/scaled-1680-/rbaimage.png)](https://wiki.nabla.sh/uploads/images/gallery/2024-11/rbaimage.png)

---

- ****Animation:****<span style="white-space: pre-wrap;"> We won’t use this for animations.</span>
- ****Simulation:****
    - ****Engine:****<span style="white-space: pre-wrap;"> All engine-related settings.</span>
    - ****Clutch:****<span style="white-space: pre-wrap;"> Clutch parameters (</span>****Not covered in this tutorial****).
    - ****Gearbox:****<span style="white-space: pre-wrap;"> Transmission parameters (</span>****Not covered in this tutorial****).
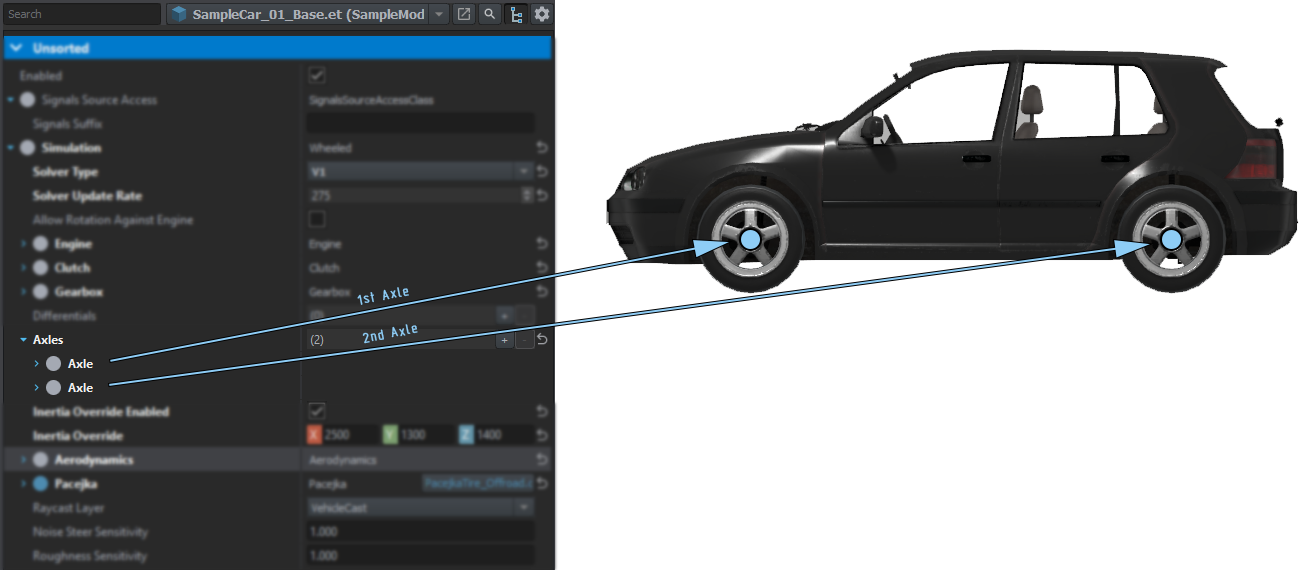
    - ****Axles:****<span style="white-space: pre-wrap;"> This is the wheel system, with one for the front and one for the rear.</span>
    - ****Aerodynamics:****<span style="white-space: pre-wrap;"> Aerodynamics (</span>****Not covered in this tutorial****).
    - ****Pacejka:****<span style="white-space: pre-wrap;"> Unsure of its purpose, but it’s quite complex, so we’ll use Bohemia Interactive’s default values.</span>
    - ****Others:****<span style="white-space: pre-wrap;"> (</span>****Not covered in this tutorial****).

---

### Engine:

When setting up engine parameters, it is possible to use real life values. Usually it's not that hard to find information about power &amp; torque of engine with RPM data attached to it. Below is table containing example source data which will be used to configure vehicle in Workbench

<table id="bkmrk-enginepowertorquei4-" style="font-size: 14px; line-height: inherit; background-color: rgb(248, 249, 250); color: rgb(32, 33, 34); margin: 1em 0px; border: 1px solid rgb(162, 169, 177); border-collapse: collapse; box-shadow: rgb(162, 169, 177) 0px 0px 0.125em; font-family: sans-serif; letter-spacing: normal; orphans: 2; text-transform: none; widows: 2; word-spacing: 0px; -webkit-text-stroke-width: 0px; text-decoration-thickness: initial; text-decoration-style: initial; text-decoration-color: initial;"><colgroup><col></col><col></col><col></col></colgroup><tbody><tr><td style="border: 1px solid rgb(162, 169, 177); padding: 0.2em 0.4em;">****Engine****

</td><td style="border: 1px solid rgb(162, 169, 177); padding: 0.2em 0.4em;">****Power****

</td><td style="border: 1px solid rgb(162, 169, 177); padding: 0.2em 0.4em;">****Torque****

</td></tr><tr><td style="border: 1px solid rgb(162, 169, 177); padding: 0.2em 0.4em;">I4 16V

</td><td style="border: 1px solid rgb(162, 169, 177); padding: 0.2em 0.4em;">86 kW at 5,800 rpm

</td><td style="border: 1px solid rgb(162, 169, 177); padding: 0.2em 0.4em;">155 N⋅m at 4,400 rpm

</td></tr></tbody></table>

<span style="white-space: pre-wrap;">Using that data, it is possible to fill following data in </span>****Engine****<span style="white-space: pre-wrap;"> section of </span>****VehicleWheeledComponent****

- ****Max Power - 85 kW****
- ****Max Torque - 155 N\*m****
- ****Rpm Max Power - 5800 rpm****
- ****Rpm Max Torque - 4400 rpm****

Below is visualization of data https://www.desmos.com/calculator/j63rwoyvnh

[![armareforger-new-engine-diagram.png](https://community.bistudio.com/wikidata/images/1/1c/armareforger-new-engine-diagram.png)](https://community.bistudio.com/wiki/File:armareforger-new-engine-diagram.png)

****Inertia****<span style="white-space: pre-wrap;"> parameter controls engine moment of inertia. In layman's term, it affects </span>****how fast engine gains or lose rpm****. High inertia results in slower gain of rpm's but it also means that less rpm will be lost during i.e. changing of gears or when releasing thrust. Table below can be used as sort of guidance but it is still recommended to experiment with that value and tweak it till reaches desired state

[![armareforger-new-engine-inertia.png](https://community.bistudio.com/wikidata/images/c/cb/armareforger-new-engine-inertia.png)](https://community.bistudio.com/wiki/File:armareforger-new-engine-inertia.png)

****Steepness****<span style="white-space: pre-wrap;"> parameter controls how fast engine can reach max torque. This parameter can be used to i.e. reduce the acceleration of the vehicle or to fine tune torque/rpm graph. Effect of that parameter can be observed below</span>

[![armareforger-new-car-steppnes.gif](https://community.bistudio.com/wikidata/images/2/29/armareforger-new-car-steppnes.gif)](https://community.bistudio.com/wiki/File:armareforger-new-car-steppnes.gif)

<span style="white-space: pre-wrap;">Rest of the RPM parameters, like </span>****Rpm Idle, Min Clutch, Redline &amp; Max****, can be also directly copied from source data if its available. In this example, following data was used

- ****Rpm Idle - 850 rpm****
- ****Rpm Min - 600 rpm****
- ****Rpm Clutch - 1500 rpm****
- ****Rpm Redline - 6500 rpm****
- ****Rpm Max - 7000 rpm****

<span style="white-space: pre-wrap;">Last but not least, there is </span>****Output****<span style="white-space: pre-wrap;"> parameter, which controls where power produced by the engine is transferred. In this example </span>****Clutch****<span style="white-space: pre-wrap;"> is used as a </span>****Output.****

---

#### Gearbox &amp; Clutch parameters

[![armareforger-new-car-axle-setup.png](https://community.bistudio.com/wikidata/images/e/ed/armareforger-new-car-axle-setup.png)](https://community.bistudio.com/wiki/File:armareforger-new-car-axle-setup.png)

<span style="white-space: pre-wrap;">In </span>****Clutch****<span style="white-space: pre-wrap;"> section of the </span>****VehicleWheeledSimulation****<span style="white-space: pre-wrap;"> component there are two parameters available. Clutch </span>****Output****<span style="white-space: pre-wrap;"> should be kept to </span>****Gearbox****<span style="white-space: pre-wrap;"> &amp; </span>****Max Clutch Torque****<span style="white-space: pre-wrap;"> - parameter controlling maximum torque that clutch can provide - should be tweaked. </span>****1.6 \*****<span style="white-space: pre-wrap;"> </span>****Max Torque****<span style="white-space: pre-wrap;"> can be a good starting point.</span>

<span style="white-space: pre-wrap;">In </span>****Gearbox****<span style="white-space: pre-wrap;"> section gear that can be filled in. In this example, following data was used as source</span>

<table id="bkmrk-final-drive68%C2%A0%3A-16-%3D" style="font-size: 14px; line-height: inherit; background-color: rgb(248, 249, 250); color: rgb(32, 33, 34); margin: 1em 0px; border: 1px solid rgb(162, 169, 177); border-collapse: collapse; box-shadow: rgb(162, 169, 177) 0px 0px 0.125em; font-family: sans-serif; letter-spacing: normal; orphans: 2; text-transform: none; widows: 2; word-spacing: 0px; -webkit-text-stroke-width: 0px; text-decoration-thickness: initial; text-decoration-style: initial; text-decoration-color: initial;"><colgroup><col></col><col></col></colgroup><tbody><tr><th class="align-center" style="border: 1px solid rgb(162, 169, 177); padding: 0.2em 0.4em; background-color: rgb(242, 242, 242); text-align: center;">****Final drive****</th><td style="border: 1px solid rgb(162, 169, 177); padding: 0.2em 0.4em;">68 : 16 = 4.250

</td></tr><tr><th class="align-center" style="border: 1px solid rgb(162, 169, 177); padding: 0.2em 0.4em; background-color: rgb(242, 242, 242); text-align: center;">****1st gear****</th><td style="border: 1px solid rgb(162, 169, 177); padding: 0.2em 0.4em;">38 : 11 = 3.455

</td></tr><tr><th class="align-center" style="border: 1px solid rgb(162, 169, 177); padding: 0.2em 0.4em; background-color: rgb(242, 242, 242); text-align: center;">****2nd gear****</th><td style="border: 1px solid rgb(162, 169, 177); padding: 0.2em 0.4em;">35 : 18 = 1.944

</td></tr><tr><th class="align-center" style="border: 1px solid rgb(162, 169, 177); padding: 0.2em 0.4em; background-color: rgb(242, 242, 242); text-align: center;">****3rd gear****</th><td style="border: 1px solid rgb(162, 169, 177); padding: 0.2em 0.4em;">37 : 27 = 1.370

</td></tr><tr><th class="align-center" style="border: 1px solid rgb(162, 169, 177); padding: 0.2em 0.4em; background-color: rgb(242, 242, 242); text-align: center;">****4th gear****</th><td style="border: 1px solid rgb(162, 169, 177); padding: 0.2em 0.4em;">32 : 31 = 1.032

</td></tr><tr><th class="align-center" style="border: 1px solid rgb(162, 169, 177); padding: 0.2em 0.4em; background-color: rgb(242, 242, 242); text-align: center;">****5th gear****</th><td style="border: 1px solid rgb(162, 169, 177); padding: 0.2em 0.4em;">34 : 40 = 0.850

</td></tr><tr><th class="align-center" style="border: 1px solid rgb(162, 169, 177); padding: 0.2em 0.4em; background-color: rgb(242, 242, 242); text-align: center;">****Reverse gear****</th><td style="border: 1px solid rgb(162, 169, 177); padding: 0.2em 0.4em;">38 : 12 = 3.167

</td></tr></tbody></table>

****Forward****<span style="white-space: pre-wrap;"> parameter contains array of </span>****forward gears****<span style="white-space: pre-wrap;">. New gears can be simply added by clicking on plus sign + on the right side of the parameter. </span>****Reverse****<span style="white-space: pre-wrap;"> parameter is used for </span>****reverse gear****<span style="white-space: pre-wrap;">. </span>****Final drive****<span style="white-space: pre-wrap;"> is defined later in differential which is defined in one of the </span>****Axles****<span style="white-space: pre-wrap;">. Depending on the configuration of the vehicle, it is possible to do various types of drive trains. In this example car is using simple </span>****forward wheels drive.****

---

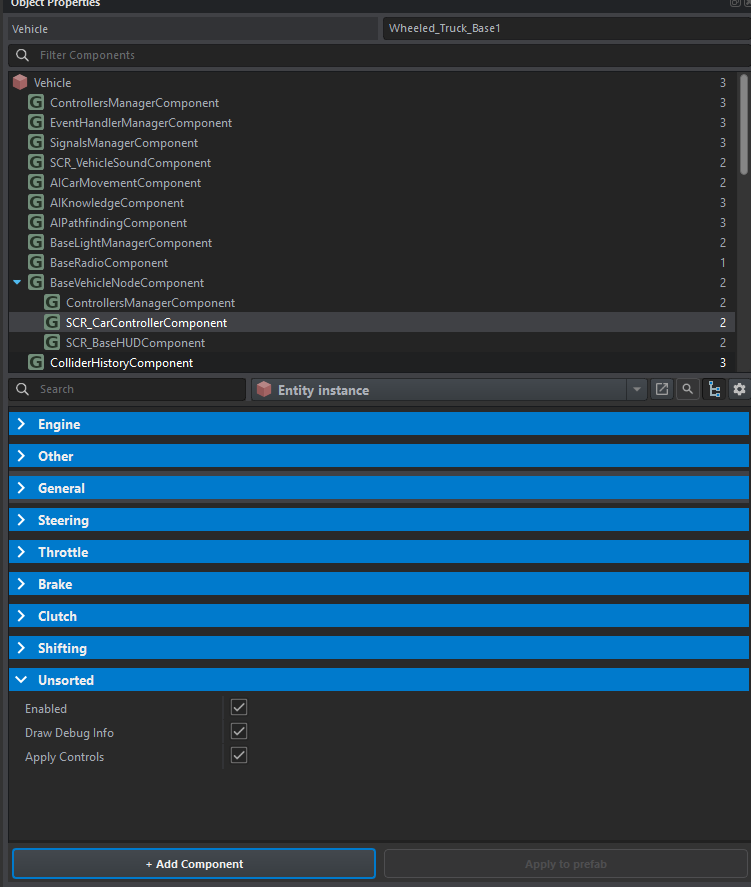
<p class="callout warning">If you encounter trouble with the speed or the gearshift you need to set up the SCR\_CarControllerComponent</p>

[![image.png](https://wiki.nabla.sh/uploads/images/gallery/2024-11/scaled-1680-/S2rimage.png)](https://wiki.nabla.sh/uploads/images/gallery/2024-11/S2rimage.png)

You can copy all the parameter from an other prefab in the vanilla game to have something functional jsut right click on the category

[![image.png](https://wiki.nabla.sh/uploads/images/gallery/2024-11/scaled-1680-/AzQimage.png)](https://wiki.nabla.sh/uploads/images/gallery/2024-11/AzQimage.png)
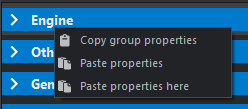
and copy from vanilla to paste in your moded car

---

#### Suspension parameters

<span style="white-space: pre-wrap;">One of the most important part of the vehicle configuration is setting </span>****Axles****<span style="white-space: pre-wrap;"> &amp; their </span>****Suspension****<span style="white-space: pre-wrap;"> values. First, it is necessary to add as many </span>****Axles****<span style="white-space: pre-wrap;"> as vehicle has. This can be done by clicking on </span>****plus +****<span style="white-space: pre-wrap;"> sign on the right side of the </span>****Axles****<span style="white-space: pre-wrap;"> property.</span>

[![armareforger-new-car-suspension-setup.png](https://community.bistudio.com/wikidata/images/7/76/armareforger-new-car-suspension-setup.png)](https://community.bistudio.com/wiki/File:armareforger-new-car-suspension-setup.png)

---

#### Wheels parameters

##### Differential and Torque Share

<span style="white-space: pre-wrap;">Each vehicle, whether it be FWD, RWD, AWD, or 4WD will have at least one differential on the drive axle. For each drive axle, choose the appropriate </span>****Type****<span style="white-space: pre-wrap;"> (Closed, Open, or Limited Slip Differential) and the </span>****Ratio****<span style="white-space: pre-wrap;"> of the differential's gear reduction.</span>

- ****Open****<span style="white-space: pre-wrap;"> differentials will split torque evenly when both tires will have equal traction, but will send all torque to a tire which loses traction. This is not ideal off road, but is the most common consumer car differential.</span>
- ****Locked****<span style="white-space: pre-wrap;"> differentials will ensure both wheels on an axle always rotate at the same speed. This provides great grip but is not ideal for turns, where wheels are meant to rotate at different speeds.</span>
- ****LSD****<span style="white-space: pre-wrap;">s are not locked but will increase grip between the wheels if one wheel loses traction. This provides a compromise between open and locked differentials. You can set the LSD's clutch grip with the </span>****Strength****<span style="white-space: pre-wrap;"> parameter.</span>

<span style="white-space: pre-wrap;">Once you have set the axle's differential type, set </span>****Output0****<span style="white-space: pre-wrap;"> and </span>****Output1****<span style="white-space: pre-wrap;"> to the left and right wheel. If you are making a vehicle with more than 1 drive axle, you will also need to deliver power to each axle with a new differential under </span>****Simulation &gt; Differentials****<span style="white-space: pre-wrap;">. Set the outputs of that differential to each axle's diff, and set the </span>****Torque share****<span style="white-space: pre-wrap;"> value of each axle to 1/N where N is the number of axles. </span>****If you do not change the torque share from 0 for each axle, it will not be used as a drive axle.****

##### Wheel

<span style="white-space: pre-wrap;">Here you can set the </span>****Radius****<span style="white-space: pre-wrap;"> in meters, </span>****Mass****<span style="white-space: pre-wrap;"> in kg, and </span>****Brake torque****<span style="white-space: pre-wrap;"> in N-m.</span>

##### Tyre

<span style="white-space: pre-wrap;">Here you can set the friction coefficient multipliers. </span>****Longitudinal****<span style="white-space: pre-wrap;"> refers to the tangent direction of the wheel (grip when accelerating) and </span>****lateral****<span style="white-space: pre-wrap;"> refers to the perpendicular to the car (grip when turning).</span>

##### <span style="white-space: pre-wrap;">Wheel Positions </span>****(to complete)****

---

#### Aerodynamics

<span style="white-space: pre-wrap;">Aerodynamics affects maximum speed and acceleration of the vehicle. Furthermore, aerodynamics drag is especially noticeable at </span>****higher speeds****<span style="white-space: pre-wrap;">, since </span>****drag increases with square of speed****.

****Reference Area****<span style="white-space: pre-wrap;"> &amp; </span>****Drag Coefficient****<span style="white-space: pre-wrap;"> values can be obtained by using values of similar vehicles, which have already those values measured. </span>****Drag Area****<span style="white-space: pre-wrap;"> (</span>**Reference Area)**<span style="white-space: pre-wrap;"> &amp; </span>****Typical drag coefficients****<span style="white-space: pre-wrap;"> </span>**(Drag Coefficient) sections**<span style="white-space: pre-wrap;"> of Auto mobile drag coefficient wiki page can be used as reference. This page contains data for quite wide array of vehicles and in most cases it is possible to pick data for something similar in size &amp; shape. In this example, </span>****Reference Area****<span style="white-space: pre-wrap;"> was set to </span>****0.62****<span style="white-space: pre-wrap;"> &amp; </span>****Drag Coefficient****<span style="white-space: pre-wrap;"> to </span>****0.31****.

---

#### Pacejka ****(to complete)****

---

#### Debugging

<span style="white-space: pre-wrap;">The </span>[Diag Menu](https://community.bistudio.com/wiki/Arma_Reforger:Diag_Menu "Arma Reforger:Diag Menu")<span style="white-space: pre-wrap;"> is accessible by holding </span>*****Windows Key + Left Alt*****<span style="white-space: pre-wrap;"> or </span>*****Windows Key + Left Ctrl*****<span style="white-space: pre-wrap;"> and if you are on Windows 11, hold all three keys simultaneously. While holding the aforementioned keys you can navigate the open menu using the </span>****Up****<span style="white-space: pre-wrap;"> and </span>****Down****<span style="white-space: pre-wrap;"> arrow keys. To modify the current selected setting use the </span>****Left****<span style="white-space: pre-wrap;"> and </span>****Right****<span style="white-space: pre-wrap;"> arrow keys. To enter a submenu use the </span>****Right****<span style="white-space: pre-wrap;"> arrow key and to leave the submenu use the </span>****Backspace****<span style="white-space: pre-wrap;"> key.</span>

<table id="bkmrk-name-%26-locationdescr" style="font-size: 14px; line-height: inherit; background-color: rgb(248, 249, 250); color: rgb(32, 33, 34); margin: 1em 0px; border: 1px solid rgb(162, 169, 177); border-collapse: collapse; box-shadow: rgb(162, 169, 177) 0px 0px 0.125em; font-family: sans-serif; letter-spacing: normal; orphans: 2; text-transform: none; widows: 2; word-spacing: 0px; -webkit-text-stroke-width: 0px; text-decoration-thickness: initial; text-decoration-style: initial; text-decoration-color: initial;"><colgroup><col></col><col></col><col></col></colgroup><tbody><tr><th class="align-center" colspan="3" style="border: 1px solid rgb(162, 169, 177); padding: 0.2em 0.4em; background-color: rgb(242, 242, 242); text-align: center;">Name &amp; location

</th><th class="align-center" style="border: 1px solid rgb(162, 169, 177); padding: 0.2em 0.4em; background-color: rgb(242, 242, 242); text-align: center;">Description

</th></tr><tr style="height: 10px;"><td rowspan="19" style="border: 1px solid rgb(162, 169, 177); padding: 0.2em 0.4em;">****Vehicles****

</td><td style="border: 1px solid rgb(162, 169, 177); padding: 0.2em 0.4em;">****Show Entry points****

</td><td style="border: 1px solid rgb(162, 169, 177); padding: 0.2em 0.4em;"></td></tr><tr><td style="border: 1px solid rgb(162, 169, 177); padding: 0.2em 0.4em;"></td><td style="border: 1px solid rgb(162, 169, 177); padding: 0.2em 0.4em;"></td></tr><tr><td colspan="2" style="border: 1px solid rgb(162, 169, 177); padding: 0.2em 0.4em;">****Enable debugger trace****

</td><td style="border: 1px solid rgb(162, 169, 177); padding: 0.2em 0.4em;"></td></tr><tr><td colspan="2" style="border: 1px solid rgb(162, 169, 177); padding: 0.2em 0.4em;">****Show stats****

</td><td style="border: 1px solid rgb(162, 169, 177); padding: 0.2em 0.4em;"></td></tr><tr><td colspan="2" style="border: 1px solid rgb(162, 169, 177); padding: 0.2em 0.4em;">****Show vehicle debug****

</td><td style="border: 1px solid rgb(162, 169, 177); padding: 0.2em 0.4em;">****Need to be activate in order to see any other parameter****

</td></tr><tr><td colspan="2" style="border: 1px solid rgb(162, 169, 177); padding: 0.2em 0.4em;">****Player vehicle only****

</td><td style="border: 1px solid rgb(162, 169, 177); padding: 0.2em 0.4em;"></td></tr><tr><td colspan="2" style="border: 1px solid rgb(162, 169, 177); padding: 0.2em 0.4em;">****Show CoM****

</td><td style="border: 1px solid rgb(162, 169, 177); padding: 0.2em 0.4em;">Toggles Center of Mass debug

</td></tr><tr><td colspan="2" style="border: 1px solid rgb(162, 169, 177); padding: 0.2em 0.4em;">****Show inertia****

</td><td style="border: 1px solid rgb(162, 169, 177); padding: 0.2em 0.4em;"></td></tr><tr><td colspan="2" style="border: 1px solid rgb(162, 169, 177); padding: 0.2em 0.4em;">****Show forces****

</td><td style="border: 1px solid rgb(162, 169, 177); padding: 0.2em 0.4em;"></td></tr><tr><td colspan="2" style="border: 1px solid rgb(162, 169, 177); padding: 0.2em 0.4em;">****Show engine****

</td><td style="border: 1px solid rgb(162, 169, 177); padding: 0.2em 0.4em;"></td></tr><tr><td colspan="2" style="border: 1px solid rgb(162, 169, 177); padding: 0.2em 0.4em;">****Show raycast****

</td><td style="border: 1px solid rgb(162, 169, 177); padding: 0.2em 0.4em;"></td></tr><tr><td colspan="2" style="border: 1px solid rgb(162, 169, 177); padding: 0.2em 0.4em;">****Show suspension****

</td><td style="border: 1px solid rgb(162, 169, 177); padding: 0.2em 0.4em;">show the travel between up and down position useful to see how their react

</td></tr><tr><td colspan="2" style="border: 1px solid rgb(162, 169, 177); padding: 0.2em 0.4em;">****Show swaybar****

</td><td style="border: 1px solid rgb(162, 169, 177); padding: 0.2em 0.4em;"></td></tr><tr><td colspan="2" style="border: 1px solid rgb(162, 169, 177); padding: 0.2em 0.4em;">****Show wheels****

</td><td style="border: 1px solid rgb(162, 169, 177); padding: 0.2em 0.4em;">Activate the diameter of the wheel (super useful for configure the radius of them)

</td></tr><tr><td colspan="2" style="border: 1px solid rgb(162, 169, 177); padding: 0.2em 0.4em;">****Show bones****

</td><td style="border: 1px solid rgb(162, 169, 177); padding: 0.2em 0.4em;">Activate the position of the bone

</td></tr><tr><td colspan="2" style="border: 1px solid rgb(162, 169, 177); padding: 0.2em 0.4em;">****Reset vehicle****

</td><td style="border: 1px solid rgb(162, 169, 177); padding: 0.2em 0.4em;"></td></tr></tbody></table>